Tag: tutorials

  • HOW TO: Export Email Subscription List from FeedBurner

    HOW TO: Export Email Subscription List from FeedBurner

    With the current uncertainty in regards to whether Google is soon to cancel their FeedBurner service, it’s a good idea to back up your email subscriber list and be prepared to choose another service to manage your RSS feeds. If you’re unsure of how to accomplish this, follow these instructions:

    1. Log into your FeedBurner account. In the “My Feeds” screen, select the feed you would like to manage.
    2. Go to the “Publicize” tab.
    3. Click on Email Subscriptions in the sidebar link list.
    4. Select the Subscription Management option that appears under Email Subscriptions.
    5. Scroll to the bottom of that screen and click on View Subscriber Details. That will show a listing of your email subscribers.
    6. Click the link beside Export that says “CSV” to download your subscriber list.

    If you would like to receive an email from us with details on options for replacing FeedBurner, subscribe to our mailing list today! HAVE A GREAT WEEKEND!

  • HOW TO: Paginate Post Content in WordPress

    Have you ever written an article that was entirely too long for one page? Here’s a quick way to break that post up into multiple pages for faster page loading, more page views in your statistics resulting in higher CPM and more ad impressions (your visitors will typically get a new ad displayed with each page load), and a better experience for your readers.

    Type your article like you normally would, all at once. When you’re finished, figure out where the breaking point (or points) should be and insert the following in HTML view:

    <!--nextpage-->

    Publish your article. You should see links to each of the pages of the article. You can manipulate the way they are displayed by modifying code in your single.php and style.css files.

    In single.php, you should see a line of code that reads something like this:

    <?php wp_link_pages(array('before' => '<p><strong>'.__('Pages','').':</strong> ', 'after' => '</p>', 'next_or_number' => 'next')); ?>

    To stylize this section, change the <p> that follows the ‘before’ tag to <div id="postpagination"> and change the </p> that follows the ‘after’ tag with </div>. This will tell your file where to pull the styling from in your css file.

    NOTE: If you would rather have the page numbers, you can change ‘next‘ (in red text) to ‘number‘ in the last part of the code. If you would like to change the text before the page links, replace Pages (in red text) with your own phrase.

    In style.css, add:

    #postpagination { font-family: Arial; font-size: 12pt; color: #000000; border: 1px #464646 solid; text-align: center; }

    You can play around with the styling until you get the pagination appearance the way you want it. That’s it! Click here to see an example of the result with one page break.

  • HOW TO: Add Your Twitter Handle to “ShareThis” Plugin Tweets

    HOW TO: Add Your Twitter Handle to “ShareThis” Plugin Tweets

    ShareThis is a great sharing plugin built for WordPress that allows visitors to share your content through their own social media network with only a couple of easy clicks. The only complaints I’ve gotten from clients who use the plugin are:

    1. The buttons are aligned to the left rather than being centered on the line they occupy
    2. When their visitors share a post via Twitter, it doesn’t mention (@) their Twitter ID
    Fixing these two quirks are pretty simple. If you don’t care about centering them, just skip to the second part and change the code in the ShareThis plugin settings screen.

    Centering the Boxes

    Rather than trying to modify the plugin code, you simply set your options and extract the code generated by the plugin to display the boxes. (Click on an image below to expand it to full size)
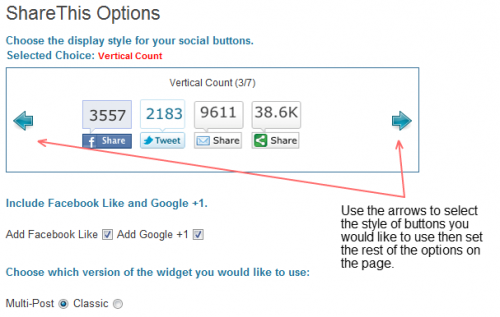
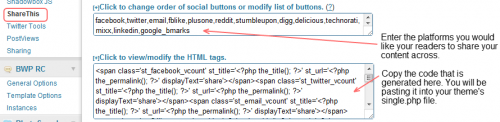
    After following the instructions in the graphic illustrations above, open your theme’s editor (in the WordPress dashboard, go to Appearance –> Editor) then click on Single Post // single.php in the file list in the right side of the page. Find the tag and execute the following either above or below it depending on whether you want the buttons to be displayed above or below your content.

    Paste the ShareThis code you copied from the plugin’s settings screen. Add <div style="text-align: center;"> to the beginning and add </div> to the end of it.

    Adding {@username} to Twitter Shares

    Find the following section in the ShareThis code:

    <span class='st_twitter_vcount' st_title='<?php the_title(); ?>' st_url='<?php the_permalink(); ?>' displayText='share'></span>

    … replace that section with this and be sure to replace YOURusernameHERE with your Twitter ID:

    <span class='st_twitter_vcount' st_title='<?php the_title(); ?> {via @YOURusernameHERE}' st_url='<?php the_permalink(); ?>' displayText='share'></span>

    That’s it. You’ve got centered boxes and your visitors’ tweets sharing your content will mention you, or your brand’s, Twitter name. If you have any questions or complications, leave me a comment below!

    Bonus: Add a share-to-Twitter link anywhere!

    Add the following code to any of your theme files:

    Using a text link:

    <a href="http://twitter.com/home?status=Currently reading @YOURusernameHERE: <?php the_title(); ?> – <?php the_permalink(); ?>" title="Twitter">Share via Twitter!</a>

    Using an image link:

    <a href="http://twitter.com/home?status=Currently reading @YOURusernameHERE: <?php the_title(); ?> – <?php the_permalink(); ?>" title="Twitter"><img src="IMAGE SOURCE URL HERE"></a>

  • HOW TO: Fix the Custom File Editor’s Fatal Call Error in Thesis Theme on WordPress 3.0

    HOW TO: Fix the Custom File Editor’s Fatal Call Error in Thesis Theme on WordPress 3.0

    If you have upgraded to WordPress 3.0 and use the Thesis theme, you may have noticed that now you receive a fatal call error when trying to access your custom.css file via the Custom File Editor within your Thesis options that looks something like this:

    Fatal error: Call to undefined function use_codepress() in /DIRECTORY/public_html/wp-content/themes/thesis_17/lib/admin/admin.php on line 42

    In order to correct this, you’ll need to disable the syntax highlighter, which is what is creating the issue. Doing this is simple.

    • Find your admin.php file located in /wp-content/themes/thesis_17/lib/admin/ (you’ll need to download an FTP client if you don’t already have one — my favorite is FileZilla)
    • Open your Notepad or other text/html editor (do not do this in Word or any other program that uses an autoformatting feature)
    • Hold down your CTRL key and press the “F” key. This should pop up a find function. Paste the following string into the box and search for it in your file:

    if (use_codepress()) add_action('admin_print_footer_scripts', 'codepress_footer_js');

    • Comment that line out of the file by placing “//” in front of it like this:

    // if (use_codepress()) add_action('admin_print_footer_scripts', 'codepress_footer_js');

    • Reupload your file using the FTP client

    VOILA! You’re done. Reload your Custom File Editor and it should work like a charm. Of course, the syntax highlighter is now disabled, but at least you can access your custom.css file from within your WordPress dashboard! :) Happy blogging to ya!

  • WordPress Basics, Part 3: Publishing Articles & Adding Media

    WordPress Basics, Part 3: Publishing Articles & Adding Media

    PLEASE NOTE: The current version of WordPress is 3.0.1. As newer versions are released, certain information provided here may possibly become outdated or irrelevant.

    Previously, I covered the differences between WordPress-hosted and self-hosted WordPress platforms as well as some tips on learning your way around the WordPress dashboard. The plan for this WordPress Basics series is to help new WordPress users become familiar with the functionality of the platform while preparing themselves to have a more comfortable and limit-free blogging experience. None of the theme-specific functions will be covered here since each theme is unique in its method of operation.

    Now that you know your way around the backend of a WordPress installation, let’s move into publishing content on your live blog site.

    (more…)